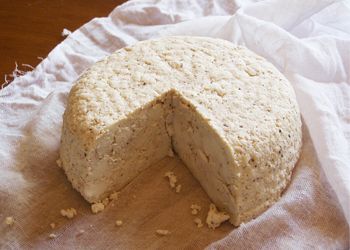
Fresh Cheese, Please

By Christine Hyatt
Hot on the heels of a return to home canning and preserving, home cheesemaking is also back on the scene with growing popularity. Cheesemaking is one of the most ancient methods of preserving fresh milk and the DIY philosophy melds with the “eat locally” mindset. Not only do you know your producer, you are the producer!
The phenomenon of making cheese at home has its roots in the back-to-the-land ideals of the 1970s. It began as a rejection of mass-produced commodity food epitomized by the likes of Velveeta and Kraft American Singles, which was first introduced in 1965.
Often, people who had goats or other dairy animals needed to do something with excess milk and making cheese was a natural fit. For many years, it was a challenge to find information and supplies necessary to make cheese on a small scale.
This changed in 1978 when Ricki Carroll launched New England Cheesemaking Supply and published “Cheesemaking Made Easy” in 1981. Many of the artisans who produce cheese today first learned from Carroll’s book.
The website, www.cheesemaking.com, is one of the finest resources for information and supplies. It is the place to go when you’re ready for some advanced cheesemaking advice.
For anyone who is thinking of getting started with cheesemaking at home, a great place to begin is with Urban Cheesecraft, a business founded by entrepreneur and passionate do-it-yourselfer Claudia Lucero.
Her stylish and handy cheese kits give beginners everything they need to experience the magical transformation of milk into fresh cheese. Fresh cheese is the quickest and easiest form of cheese. It requires no special tools and can be table ready in just over an hour.
Lucero, who opened her Portland-based business in 2008 and also works as Operations Director for the nonprofit Rock & Roll Camp for Girls, was surprised by her booming business.
“I thought it would be a hobby and wasn’t really expecting it to grow, but it was the right thing at the right time,” she said. “In Portland, it is the norm that people want to be self-sufficient. We grow tomatoes and can sauce, we bake pies with fresh-picked berries. We want to know where our food comes from.”
A foodie into growing her own vegetables and preserving, cheese was a natural next step. In high school, Lucero worked in an Indian restaurant that served house-made Paneer, a fresh cheese common in South Asian cuisine. Later, when she saw that mozzarella and other fresh cheeses were also easy, she was hooked.
“People assume it is much harder than it is,” Lucero said. Her exploration of fresh cheeses began in earnest around the holidays when her latest cheese discoveries were featured at gatherings. People were amazed she could do this.
“I’ve always been of a business mind, always asking ‘how could I improve this or that, make it easy to find and do?’” she said. “I geared the business toward people who were rediscovering stuff people were doing in the ’70s, like people making pickles and the knitting crowd.”
Lucero realized it is easy to make a variety of fresh cheeses — from Farmers Cheese and Paneer to Ricotta and Mozzarella — and enjoy them that same day. Unlike aged cheeses, which require special conditions and extended time for aging, she tailored the cheesemaking experience around quick, simple cheeses.
“My focus is to get people started,” Lucero said. “The kits provide the initial germ of experience, and I include everything you need to make about 10 batches of cheese, except the milk.”
As far as sourcing the milk, there are many options. Her website, www.urbancheesecraft.com, provides a listing of sources for locally produced milk. In a pinch, pasteurized — but not ultra-pasteruized — milk will do just fine.
If you’re looking to make goat cheese, check out Portland-based natural retailer New Seasons.
“We are very excited to be able to offer a local, raw goat’s milk from Gary’s Dairies, a small family farm in Oregon City,” said Debbie Harris, New Seasons cheese merchandiser. “Our customers have been asking for raw goat’s milk both for home cheesemaking and personal consumption, and we think Gary’s Dairies milk is a perfect fit for both.”
Fresh cheeses are high in moisture, tend to be mild in flavor but are easily enhanced with herbs and seasonings. They are also wonderful for cooking. Because of their mellow flavor, choose wine pairings based on the flavors of the particular dish featuring the cheese.
As the eat local, DIY vibe continues to flourish in communities around the country, home cheesemaking is just one more way to experience food on a whole new level.
Christine Hyatt is a food writer and educator who is passionate about cheese. She blogs, streams video and answers cheesy questions at www.cheese-chick.com.
RECIPE
Queso Blanco
Recipe courtesy of Claudia Lucero of Urban Cheesecraft in Portland
“To use this cheese in salads, I drizzle a little olive oil in a cast iron pan, sprinkle the cheese with salt, pepper, sometimes chili powder (any herbs and spices you like), brown it (it uniquely doesn’t melt, just browns and gets soft and chewy) and then add the crusty warm chunks to our salads. Use any dressing you enjoy. SO GOOD and a full meal!” —Claudia Lucero owner of Urban Cheesecraft
INGREDIENTS
1 gallon of whole or low-fat milk (cow or goat) Note: Regular grocery store
pasteurized is fine but NOT ultra or ultra-heat pasteurized.
¼–½ cup of vinegar (I use apple cider; they all give their own flavor)
1–2 teaspoons salt, to taste (At this point, you can also add chives, fresh chopped
herbs, cayenne, anything!)
DIRECTIONS
1. Heat the milk to a foamy, steamy simmer. Do not allow to boil or your cheese will taste cooked and will be rubbery. If you have a thermometer it would be between 180°F to 195°F. Be sure to stir often to prevent scorching. 2. When you see steam and foam and a gentle simmer, turn the temperature to low and slowly drizzle in your vinegar. You may not need it all before you start seeing the clear separation between curds and whey. It’s like magic! When you see it, stop the drizzle and cook for about 10 seconds longer. 3. Turn off the heat and ladle, or pour, your curds into a colander lined with butter muslin or cheesecloth. (A boiled tea towel or even a large coffee filter can work, too. If you use regular grocery store cheesecloth, triple it at least — the holes are very large). Allow to drain for 20 minutes or so. 4. Then take your cloth corners and gently twist more whey out of the bundle. Open it up and mix in your salt. Stir it in evenly and taste until you like it. 5. For a softer cheese, hang this from a hook or faucet, and let it drain for another hour or so (place a bowl underneath to catch the whey). You have now made a “fresh cheese,” “bag cheese,” “farmer cheese” or, in our case, Queso Blanco. For a firm cheese that you can cut up and use as a meat replacement (like tofu), place the bundle back in the colander, put a plate on top of it and then fill the empty gallon of milk with water, and use it as a weight on top of the plate. Let this sit and continue to drain for 1 more hour or until the cheese is as firm as you like it. Eat fresh and soft as is or cover and refrigerate. (It firms up more in the fridge.)
For more recipes like this, plus information on home cheesemaking, visit www.urbancheesecraft.com.


